How to make star trails without leaving your home during Coronavirus quarantine.
What are star trails?
Star trails are long-exposure photographs lasting several hours, in which stars streak across the sky as they move. Well, in fact, they are not moving, but we are moving along with the rotation of the Earth, creating a amazing visual effect into a long exposure photograph.
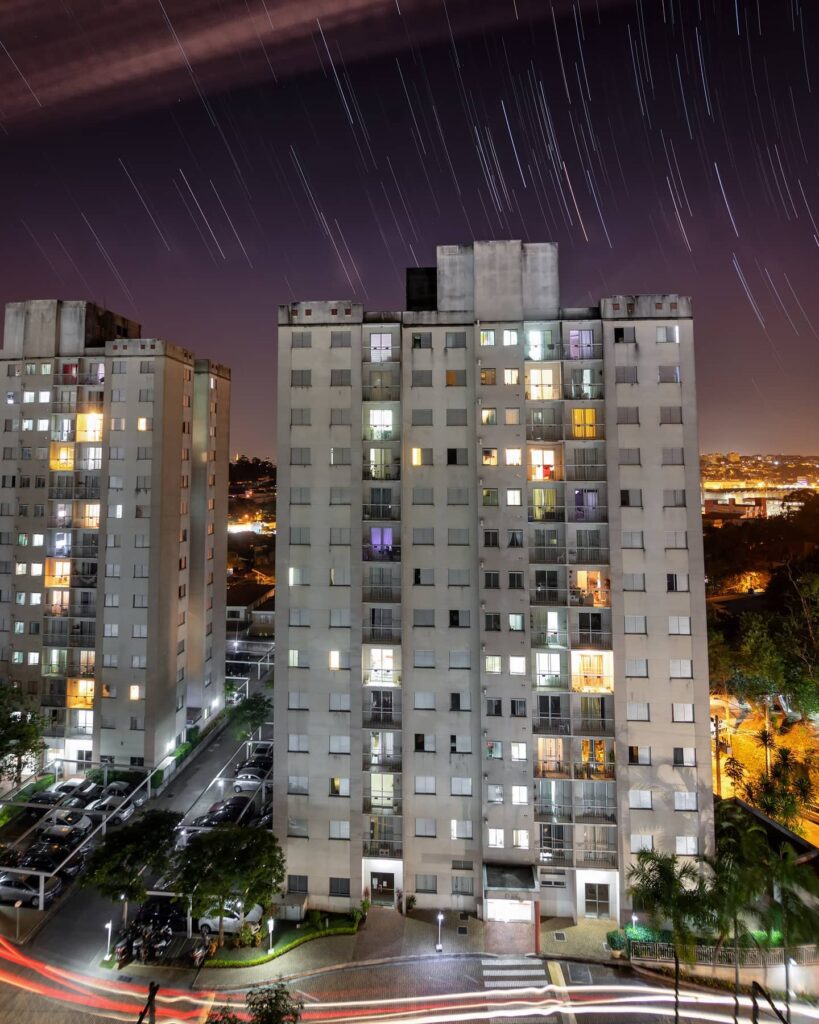
This photo was taken by photographer Bruno Nonogaki, and was taken in the last few days during the quarantine, he kindly authorized to post his photo here to inspire you! Bruno is a landscape and travel photographer, you can check his instagram by clicking on the link below:
To obtain this result, Bruno took 90 photos with 20 seconds each, in a total of half an hour shooting with a 16mm lens, aperture f/7.1 and ISO 200.
How long can I do it?
The longer you shoot, the bigger and more beautiful the traces of the stars will be, the ideal is to take a photo with at least half an hour of total exposure and the maximum is the limit of the night. But wait, if you do an hour or two of exposure, all the other lights besides the stars will burst, so how can we do it?
We will take several photographs of 30 seconds, over half an hour, an hour, or more, and for this we will use an intervalometer, some cameras already come with a built-in intervalometer, inside it and you can access it through the menu. If you don’t have an intervalometer and your camera doesn’t have one either, and you have a lot of patience, you can do this manually, clicking at the end of every 30 seconds, I’ve seen some people do this and the result was great, but be very careful you cannot move the camera while doing this, any small movement can ruin your photograph.
I will put down here the step by step of how you can configure the intervalometer of some Canon camera models, the latest releases of the brand have already come with a built-in intervalometer, and all Nikon models, with the exception of the D3X00 and D5X00 line.
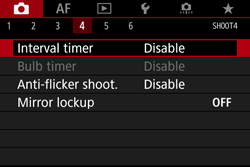
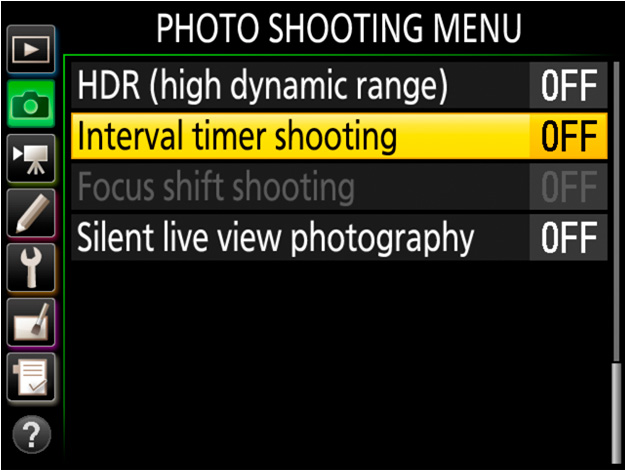
How to configure Canon's built-in intervalometer to make a Star Trail?
1 – Access the Menu and then on the Camera tab, access the fourth submenu, and select the Interval Timer option, then press Set.
2 – You will open the Interval Timer panel, there in the left corner below the screen, you will see the option INFO – Detail Set, Click on INFO to access this menu.
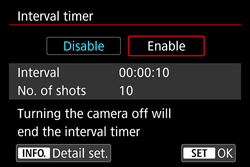
3 – Now you will open the menu Adjust interval and shots, in Interval, you will adjust the interval between each photograph, I usually leave it in 3 seconds, a very short time can make your sensor overheat and a long time will leave the your star trails failed.
Next let’s adjust the number of shots, I recommend leaving it at 00 – unlimited, so you can stop your camera anytime you want, after half an hour, an hour, etc.
To finish, select OK.
4 – Now just click on activate, and the next time you click to shoot, the intervalometer will be activated. To stop, just turn the camera off whenever you want.
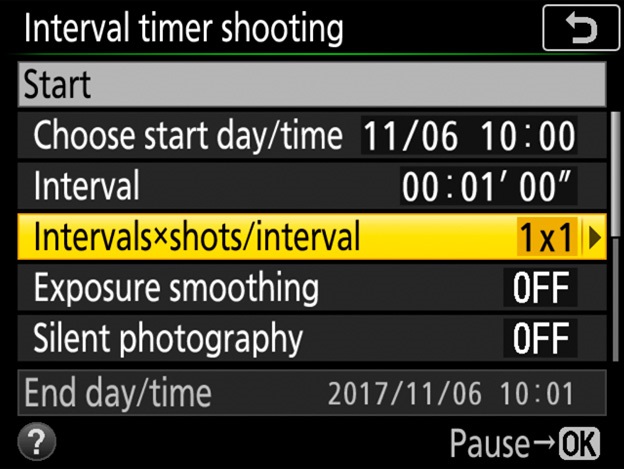
How do I set up Nikon's intervalometer to make a Star Trail?
1 – Access the camera menu, and in the Camera tab, select Interval Timer Shooting, you will open the interval timer shooting menu.
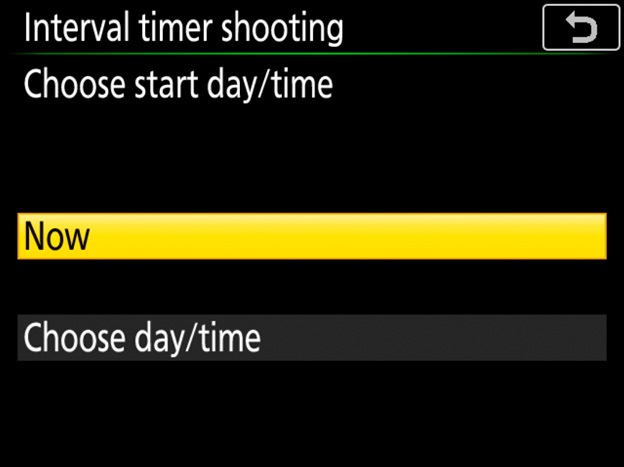
2 – This step you need to do only once, enter the option Choose start day/time, and then select the Now option.
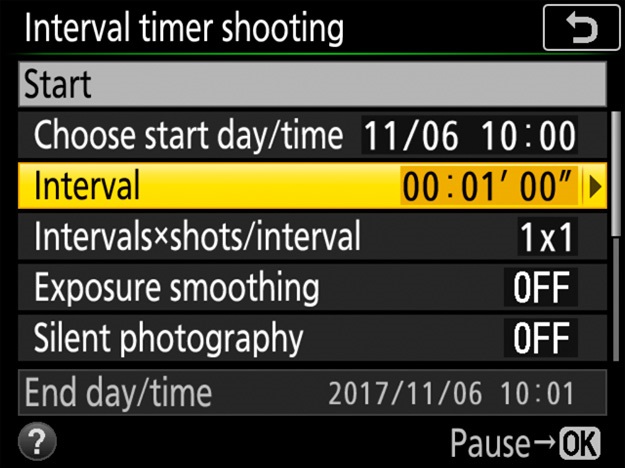
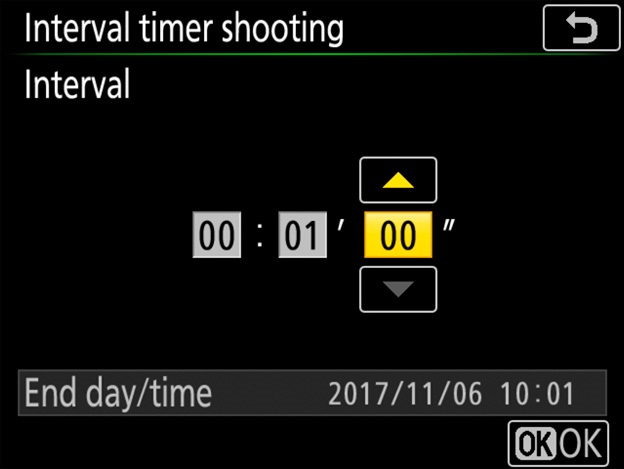
3 – You will return to the previous menu, this time select the Interval option.
4 – Here you will configure the shot interval, the first block is hours, the second minutes and the third seconds. We will configure the interval in 33 seconds here. Be very careful, some models of Nikon cameras consider the interval between each click of the camera, so if you are doing a 30 second exposure, you need to put 33 seconds here, if you are doing a 15 seconds exposure, you need to put 18 seconds, do some tests before start to shooting.
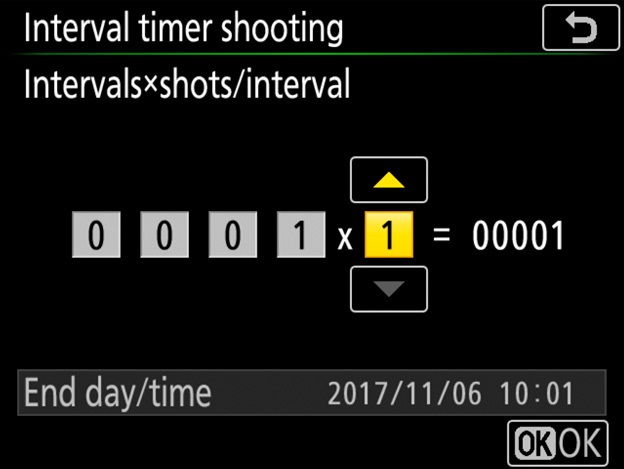
5 – Next, we will access the Intervals x shots/interval menu.
6 – Here you will configure the number of shot, the first block is the number of shots. In Nikon cameras we do not have the option of infinity shot, so I usually leave it at 9999 shots. The second block is how many photos your camera takes per shot, if it is set to 3, at each interval it will take 3 photos in a row, be careful, here you need to leave it at 1.
All set, your camera will start automatically shooting from this point, if you want to stop, just turn off the camera.
What I need?
Camera and lens of your choice
Intervalometer
Tripod
Lots of patience
What configuration do I use?
You can use f / 8, ISO 400 and 30 ”exposure time as a starting point. Try to use a wide open lens, a wide angle or the 18mm kit lens, so you can frame the environment around you and the stars without any problems. Make a test, if the photo comes out too dark or too light change the ISO until it is at a point you like.
Very important: Remember to turn off your camera’s long exposure noise reduction.
How to focus?
Try to focus in a very distant light in autofocus, and then switch to manual focus. Now, your camera is already set up, and you can set the intervalometer to start your photo sequence to mount a Star Trail.
Where to shoot?
Do some tests until you find a frame that you like before turning on the intervalometer!
If you want to see that circle of rotation of the stars in your photograph, you need to have a window with a view to the North if you are in the northern hemisphere, or with a view to the South in the southern hemisphere, so you can photograph the center of rotation of the Earth , but don’t get stuck in it, look for a frame that you like and a clean night, preferably without clouds and without moon, and shoot! Experiment with different windows, even the bathroom window in your apartment may be hiding a very interesting frame.
How to assemble the Star Trail sequence?
First let’s edit the photo sequence in Lightroom.
In an hour, with 30 seconds of photography, we will have two photos per minute, that is 120 photos per hour. So we will have 120 photographs every hour.
Edit the first photo the way you like it, I usually only work with sharpness, contrasts and white balance.
Then select the entire sequence of photos you took and go to the Synchronize option, it will synchronize the edition you made for all other photos.
Now after synchronizing your photo, still with all selected, export all of them at once to a folder of your choice, it is important to separate a folder for this edition so you don’t get lost.
I don't know how to use Lightroom?
If you don’t use Lightroom skip this step, try shooting in JPG to make it easier, and let’s go straight to the stacking process, then you edit the final photo in the editing software of your choice.
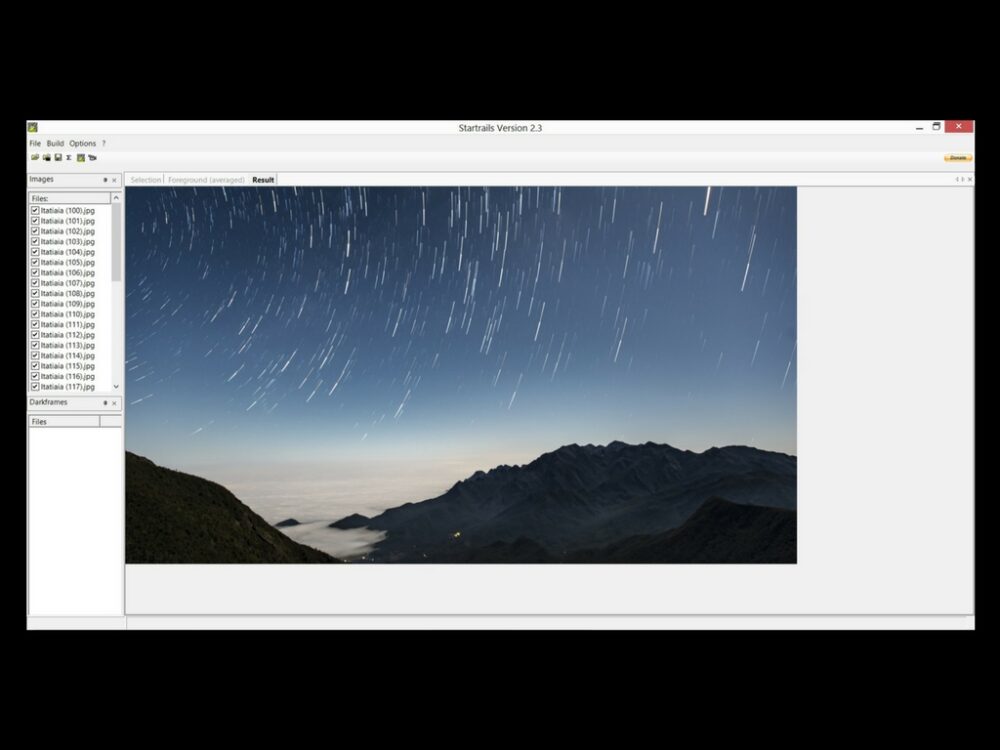
Stacking your Star Trails
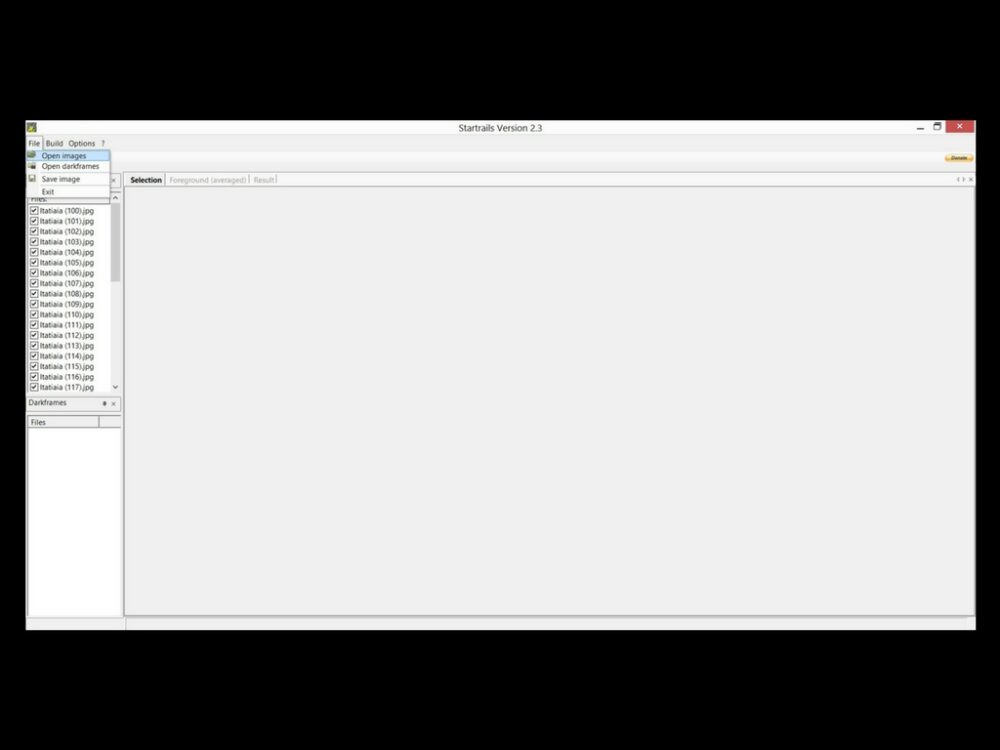
Now we are going to stack the sequence using the program Startrail.exe which can be downloaded from the link below.
This program is very easy to use, you don’t need to install it on your computer, you run it directly from the folder you unzipped it with.
Opening the program, go to File – Open images and you select the entire sequence of photos you exported.
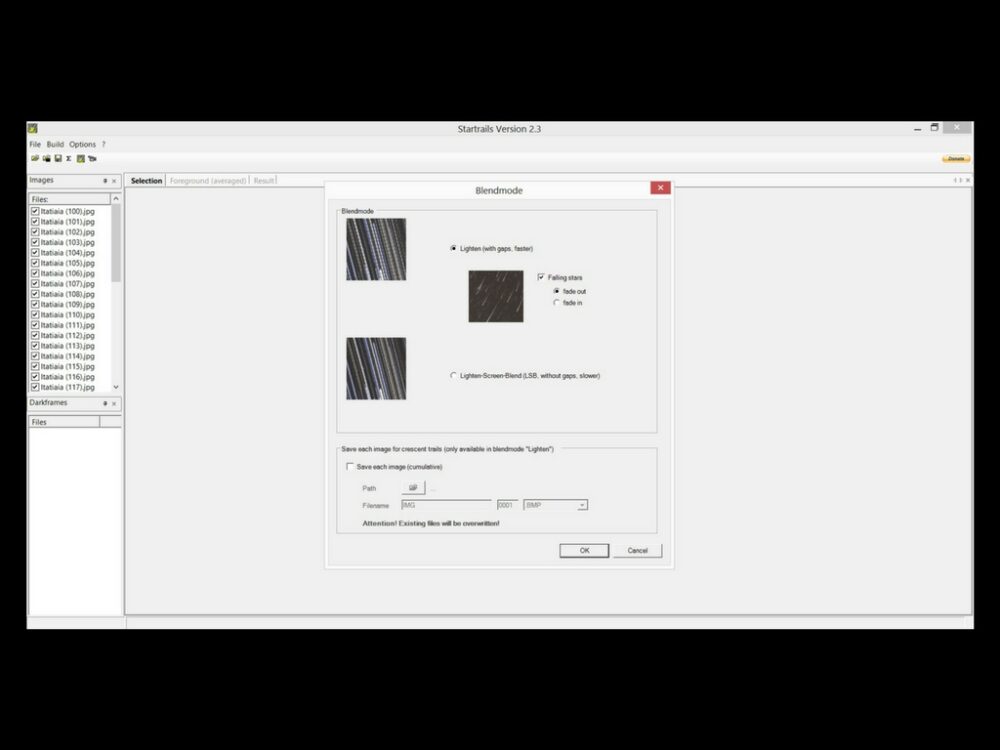
Then just go to Build – Startrails, select the option “Lighten-Screen-Blend” and click on Ok, it will start to build your sequence automatically.
Important: If any photo goes out of alignment, you need to exclude it from the sequence, just deselect it there on the left and start to mount again.
Once it’s ready you go to Save Image, and you’re done! If you haven’t edited in Lightroom before, you can now open that final image and edit in your favorite editing software.
Luminar
I usualy use Luminar to do my fine editing, even having edited it on Lightroom before, if you don’t know this program yet, you can download a trial version from this link here:
If you like it and decide to buy, I really appreciate it if you can buy through this link, it is an affiliate link, you help me to keep producing articles like this.
For star trails, you can use it as a last step, after you have assembled the trails.
Photographic expeditions - South America
If you liked the tip, we organize photographic expeditions to South America and other places in the world. Our main language is Portuguese but we speak English and Spanish.
Antes de embarcar em qualquer jornada — seja um workshop ou uma expedição — convidamos você a ler com atenção os termos de cancelamento.
Eles são como o mapa antes da travessia: ajudam a compreender o terreno, os ventos e as marés que podem mudar o rumo da viagem.
Ler os termos é um gesto de cuidado — consigo, com quem organiza e com o próprio fluxo da experiência.
Assim, tudo segue em harmonia: a aventura começa com clareza, respeito e serenidade. Dispensar